Automatically Add Lights: When enabled, allows ICErender to automatically place a specified number of lights in a scene to provide additional illumination. When you turn Reveal on for the first time, or render with Photo, by default, the Automatically Add Lights setting is already enabled.
Note: This applies to Reveal and Photo settings.
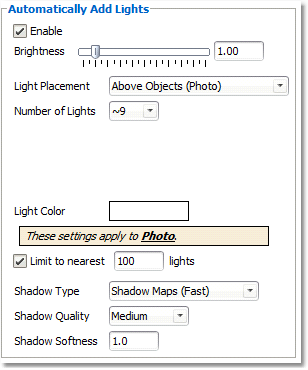
To enable and adjust Automatically Add Lights:
1.In the Lighting tab of the Styles Settings menu, the Automatically Add Lights function is already enabled. De-select Enable and click OK to disable this function.
2.Brightness: To modify the Brightness of the automatic lights, adjust the Brightness slider or enter a specific value, then click OK.
a.Note: Values beyond 2.00 can be very bright.
3.Light Placement: In the drop-down, select how the automatic lights will be positioned.
•Light Grid applies to Reveal and Photo only. This is the only Light Placement option that functions when rendering with Reveal Settings.The light grid places lights throughout the entire scene at a fixed height in an even, uniform, grid-like pattern.
oHeight: Enter a value to adjust the height of the lights from the floor.
oSpacing: Enter a value to adjust how far apart each automatic light is placed on the light grid. The further the spacing, the dimmer the drawing will appear.
oOffset X/Offset Y: Enter a value in either field to adjust the positioning of the light grid along the X and Y axes.
oLight Color: Click in the white rectangle to change the color of the automatic lights.
•Above Objects applies only to Photo. These lights shine down from above the model. Recommended for shots taken from further away. However, if you have a ceiling present, it will block these lights.
oNumber of Lights: approximate number of lights placed throughout the entire layout.
oLight Color: Click in the white rectangle to change the color of the automatic lights.
•In Front of Camera applies only to Photo. These lights are place in front of the camera, at a fixed height. These lights illuminate only what's close by. Recommended for “close up” shots of a particular object.
oNumber of Lights: Number of lights placed near the camera.
oHeight: Enter a value to adjust the height of the lights from the floor.
oLight Color: Click in the white rectangle to change the color of the automatic lights.
4.Limit to nearest ____ lights: When enabled, ICErender will only use the closest lights to illuminate the scene in order to save memory and maximize rendering time.
5.Shadow Type: Select the type of shadows from the drop-down menu.
•Shadow Maps (Fast): Quicker rendering time, less quality
•Area Shadows (Accurate): More quality, but may require more rendering time.
•No Shadows Shadows will not be applied.
6.Shadow Quality: Select Low, Medium, or High from the drop-down menu. NOTE: Selecting Medium or High for Shadow Maps can often give high quality shadows and render more quickly than Area Shadows.
7.Shadow Softness: Controls the definition of shadow lines. Settings below of “1” will render stark, hard shadow lines, with the “fuzziness” of the shadows increasing as the number is increased to a maximum of 10.
a.Note: “5” is a recommended setting.