The Enzo Reveal solution can be specified in multiple ways. You can specify both horizontal and vertical reveals as Enzo, Classic, or a combination. Many conditions are still in product development, so it is best to contact your project manager or info@dirtt.net for further assistance.
Specifying reveals in ICE should be completed after the design is complete. To do this:
1.Create an Elevation Set.
2.Under the View menu, check the box next to Show DIRTT Reveal Details.
a.The elevations will display the color-coding for reveals specified.
3.Box-select the wall(s) where you wish to apply the Enzo Reveal.
a.Be sure to select the end-posts when box-selecting.
4.Right-click and select Properties.
5.Under Extrusions, change Horizontal and Vertical Reveals to Enzo Reveal.
a.Only conditions where it is possible to use the Enzo Reveal will change.
6.Verify each reveal condition has been specified correctly.
a. For example...
If End posts are not box-selected with the wall, the End Posts will need to be specified separately. See below, End Posts with Enzo Reveal, for more information.
|
Conditions and Examples
These cross-section images below show the difference between the reveal size for Classic and Enzo. Notice that the reveal gap is slimmer on the Enzo Reveal than the Classic. Below is a list of specific examples that explains how to approach them when verifying each reveal in your design. Many conditions are still in product development, so it is best to contact your project manager or info@dirtt.net for further assistance.
 Classic Reveal |
 Enzo Reveal |
End Posts will change to Enzo when you box-select the wall(s) and change the Vertical Reveal to Enzo Reveal. When you verify each reveal condition, the End Posts can be specified separately as Enzo Reveal if they were not changed when the wall(s) were set to Enzo. To do this:
1.Select the end-post. 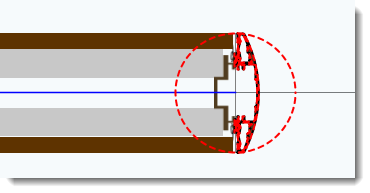
2.Right-click and select Properties. 3.Under Extrusions, change Vertical Reveal to Enzo Reveal.  Enzo End Post
|
Vertical Extrusions and Stacked Conditions change when you box-select wall(s) and change the Vertical Reveal to Enzo Reveal. These conditions can also be specified separately from box-selecting. To do this:
1.From the elevation, select the reveal adjacent to the stacked segment. 2.Right-click and select Properties. 3.Under Extrusions, change Vertical Reveal to Enzo Reveal. a.For a clean look, match the vertical above and/or below the condition; see examples on Reveal Legend on myDIRTT or contact info@dirtt.net for further assistance.  Enzo Stacked Condition |
To achieve the Enzo aesthetic for a horizontal reveal in a stacked condition, specify both horizontal reveals as an Enzo Reveal. To do this:
1.Select both horizontal reveals in the stacked segment. a.To select both at the same time, hold Ctrl while selecting each. 2.Right-click and select Properties. 3.Under Extrusions, change Horizontal Reveal to Enzo Reveal. |
Solid and Glass wall combinations can have vertical and horizontal Enzo Reveals. Specify the vertical and horizontal reveals as Enzo Reveals. To do this:
1.Select the reveal adjacent to the glass wall segment. 2.Right-click and select Properties. 3.Under Extrusions, change Vertical and Horizontal Reveal to Enzo Reveal. 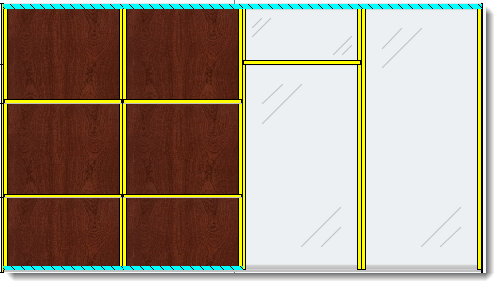
|
To achieve the Enzo aesthetic with glass and stick built walls, specify the horizontal reveal as an Enzo Reveal. To do this:
1.Select the horizontal reveal in the glass or stick built wall. 2.Right-click and select Properties 3.Under Extrusions, change Vertical and Horizontal Reveal to Enzo Reveal 
|
To achieve a Classic aesthetic, specify the horizontal and vertical reveals as Classic Reveals. To do this:
1.Create an Elevation Set 2.Under the View menu, check the box next to Show DIRTT Reveal Details a.The elevations will display the color-coding for which reveals are specified. 3.Select the wall(s) where you wish to apply the Classic Reveal 4.Right-click and select Properties 5.Under Extrusions, change Horizontal and Vertical Reveals to Classic Reveal 6.Verify each reveal condition has been specified correctly.

|
See also: Reveal Legend, Show DIRTT Reveal Details